Expand Longhorn Disk Space
This article describes the steps to scale the Longhorn storage capacity in one of the ECS nodes (ecsworker3.cdpkvm.cldr) by adding a new disk into the existing Longhorn volume disk that had initially been deployed with LVM (Logical Volume Manager). This is only applicable to CDP Private Cloud solution installed with ECS system. Ensure that other available nodes have sufficient storage capacity to take over and store the current volume replicas of this ECS node prior to running the following activity.
-
In the event that CDW is part of the CDP PvC workloads on this ECS platform, ensure that the CDW pods are not provisioned on this particular ECS node. The CDW disk should be empty. Note that the
localpathdirectory was configured as the mountpoint for CDW disk during the ECS installation.# tree /localpath/ /localpath/ `-- local-storage 1 directory, 0 files -
All ECS nodes are now in
Readymode.# kubectl get nodes NAME STATUS ROLES AGE VERSION ecsmaster1.cdpkvm.cldr Ready control-plane,etcd,master 4d14h v1.21.8+rke2r2 ecsworker1.cdpkvm.cldr Ready <none> 4d13h v1.21.8+rke2r2 ecsworker2.cdpkvm.cldr Ready <none> 4d13h v1.21.8+rke2r2 ecsworker3.cdpkvm.cldr Ready <none> 14m v1.21.8+rke2r2 -
In CM, navigate to
Clusters>ECS>Storage UIto launch the Longhorn dashboard. ClickNodeat the Longhorn dashboard. Note that ecsworker3.cdpkvm.cldr node has 4 volume replicas currently.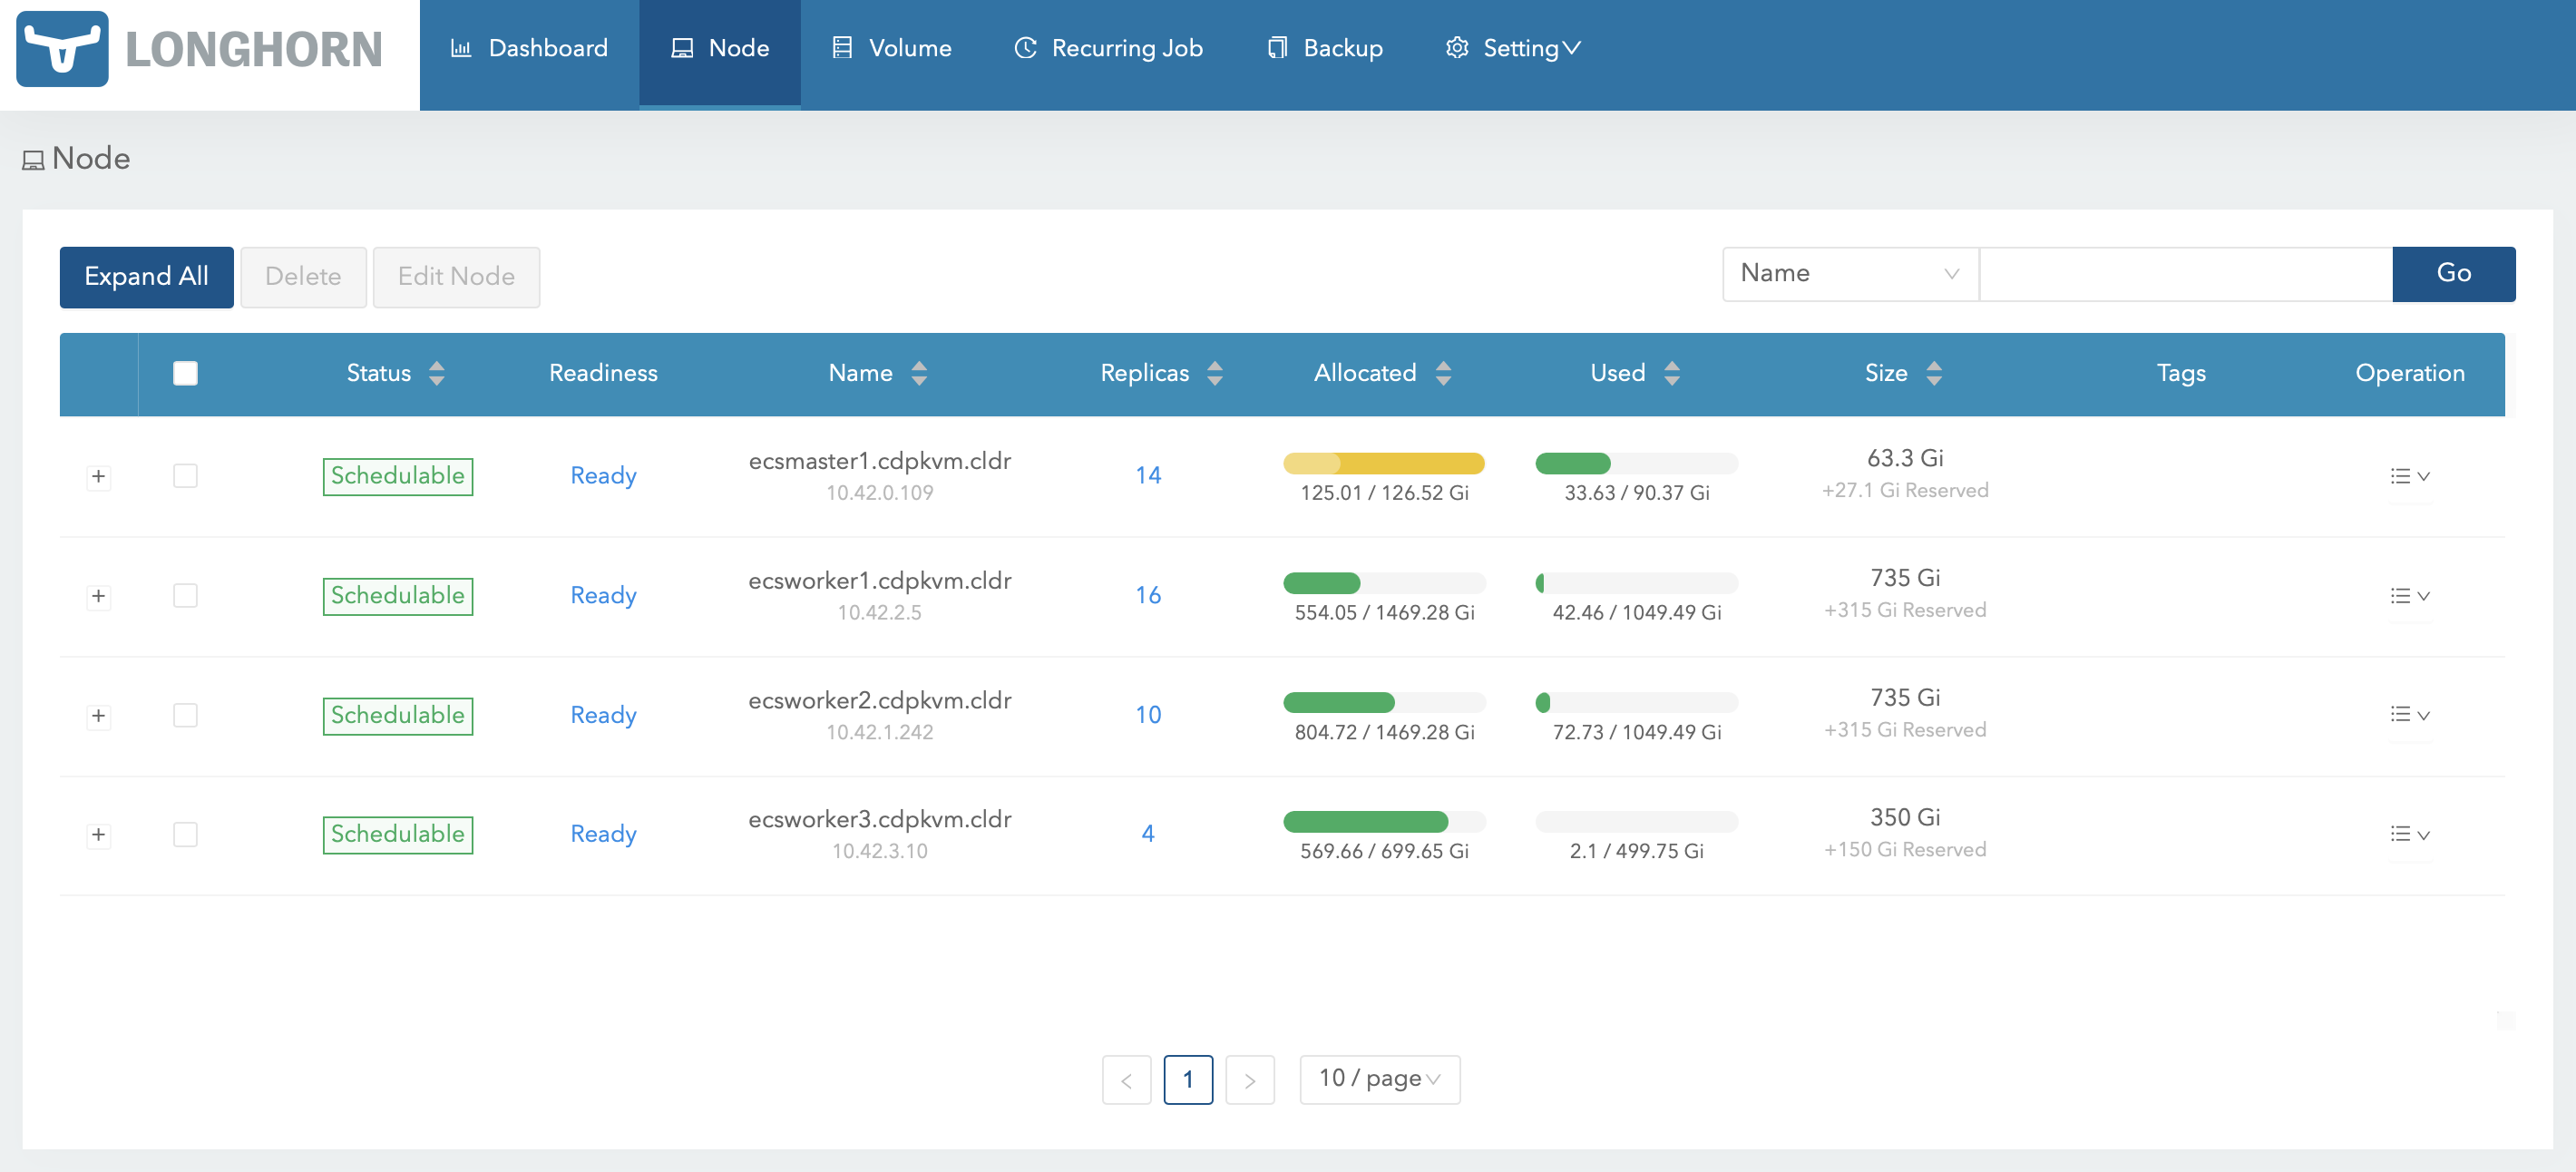
-
At the ecsworker3.cdpkvm.cldr node, check the status of the
/longhorndirectory. Thelonghorndirectory was configured as the mountpoint for longhorn disk during the ECS installation.# tree /longhorn /longhorn `-- ecs `-- longhorn-storage |-- longhorn-disk.cfg `-- replicas |-- pvc-1e3726f1-5316-470f-bc8c-d916329eb98d-ba87e915 | |-- revision.counter | |-- volume-head-000.img | |-- volume-head-000.img.meta | `-- volume.meta |-- pvc-3e9d28f0-441f-4239-b561-bdee3d789781-de260f3d | |-- revision.counter | |-- volume-head-000.img | |-- volume-head-000.img.meta | `-- volume.meta |-- pvc-4e711771-4928-48d3-853a-384db8a5e050-c6230c5a | |-- revision.counter | |-- volume-head-000.img | |-- volume-head-000.img.meta | `-- volume.meta `-- pvc-8636d6a3-01e2-499e-b30f-e0ab43f51fc8-ff55c10f |-- revision.counter |-- volume-head-000.img |-- volume-head-000.img.meta `-- volume.meta 7 directories, 17 files -
Run the following command to evict all of the pods from ecsworker3.cdpkvm.cldr node.
# kubectl drain ecsworker3.cdpkvm.cldr -
Note that ecsworker3.cdpkvm.cldr is now in
Ready,SchedulingDisabledmode.# kubectl get nodes NAME STATUS ROLES AGE VERSION ecsmaster1.cdpkvm.cldr Ready control-plane,etcd,master 5d14h v1.21.8+rke2r2 ecsworker1.cdpkvm.cldr Ready <none> 5d14h v1.21.8+rke2r2 ecsworker2.cdpkvm.cldr Ready <none> 5d14h v1.21.8+rke2r2 ecsworker3.cdpkvm.cldr Ready,SchedulingDisabled <none> 24h v1.21.8+rke2r2 -
At the ecsworker3.cdpkvm.cldr node, check the status of the
/longhorndirectory. Thekubectl drain nodecommand should have relocated the volume replicas away from the ecsworker3.cdpkvm.cldr node to other available nodes. Thus,/longhorndirectory in the ecsworker3.cdpkvm.cldr node should be empty as shown below.# tree /longhorn /longhorn `-- ecs `-- longhorn-storage |-- longhorn-disk.cfg `-- replicas 3 directories, 1 file -
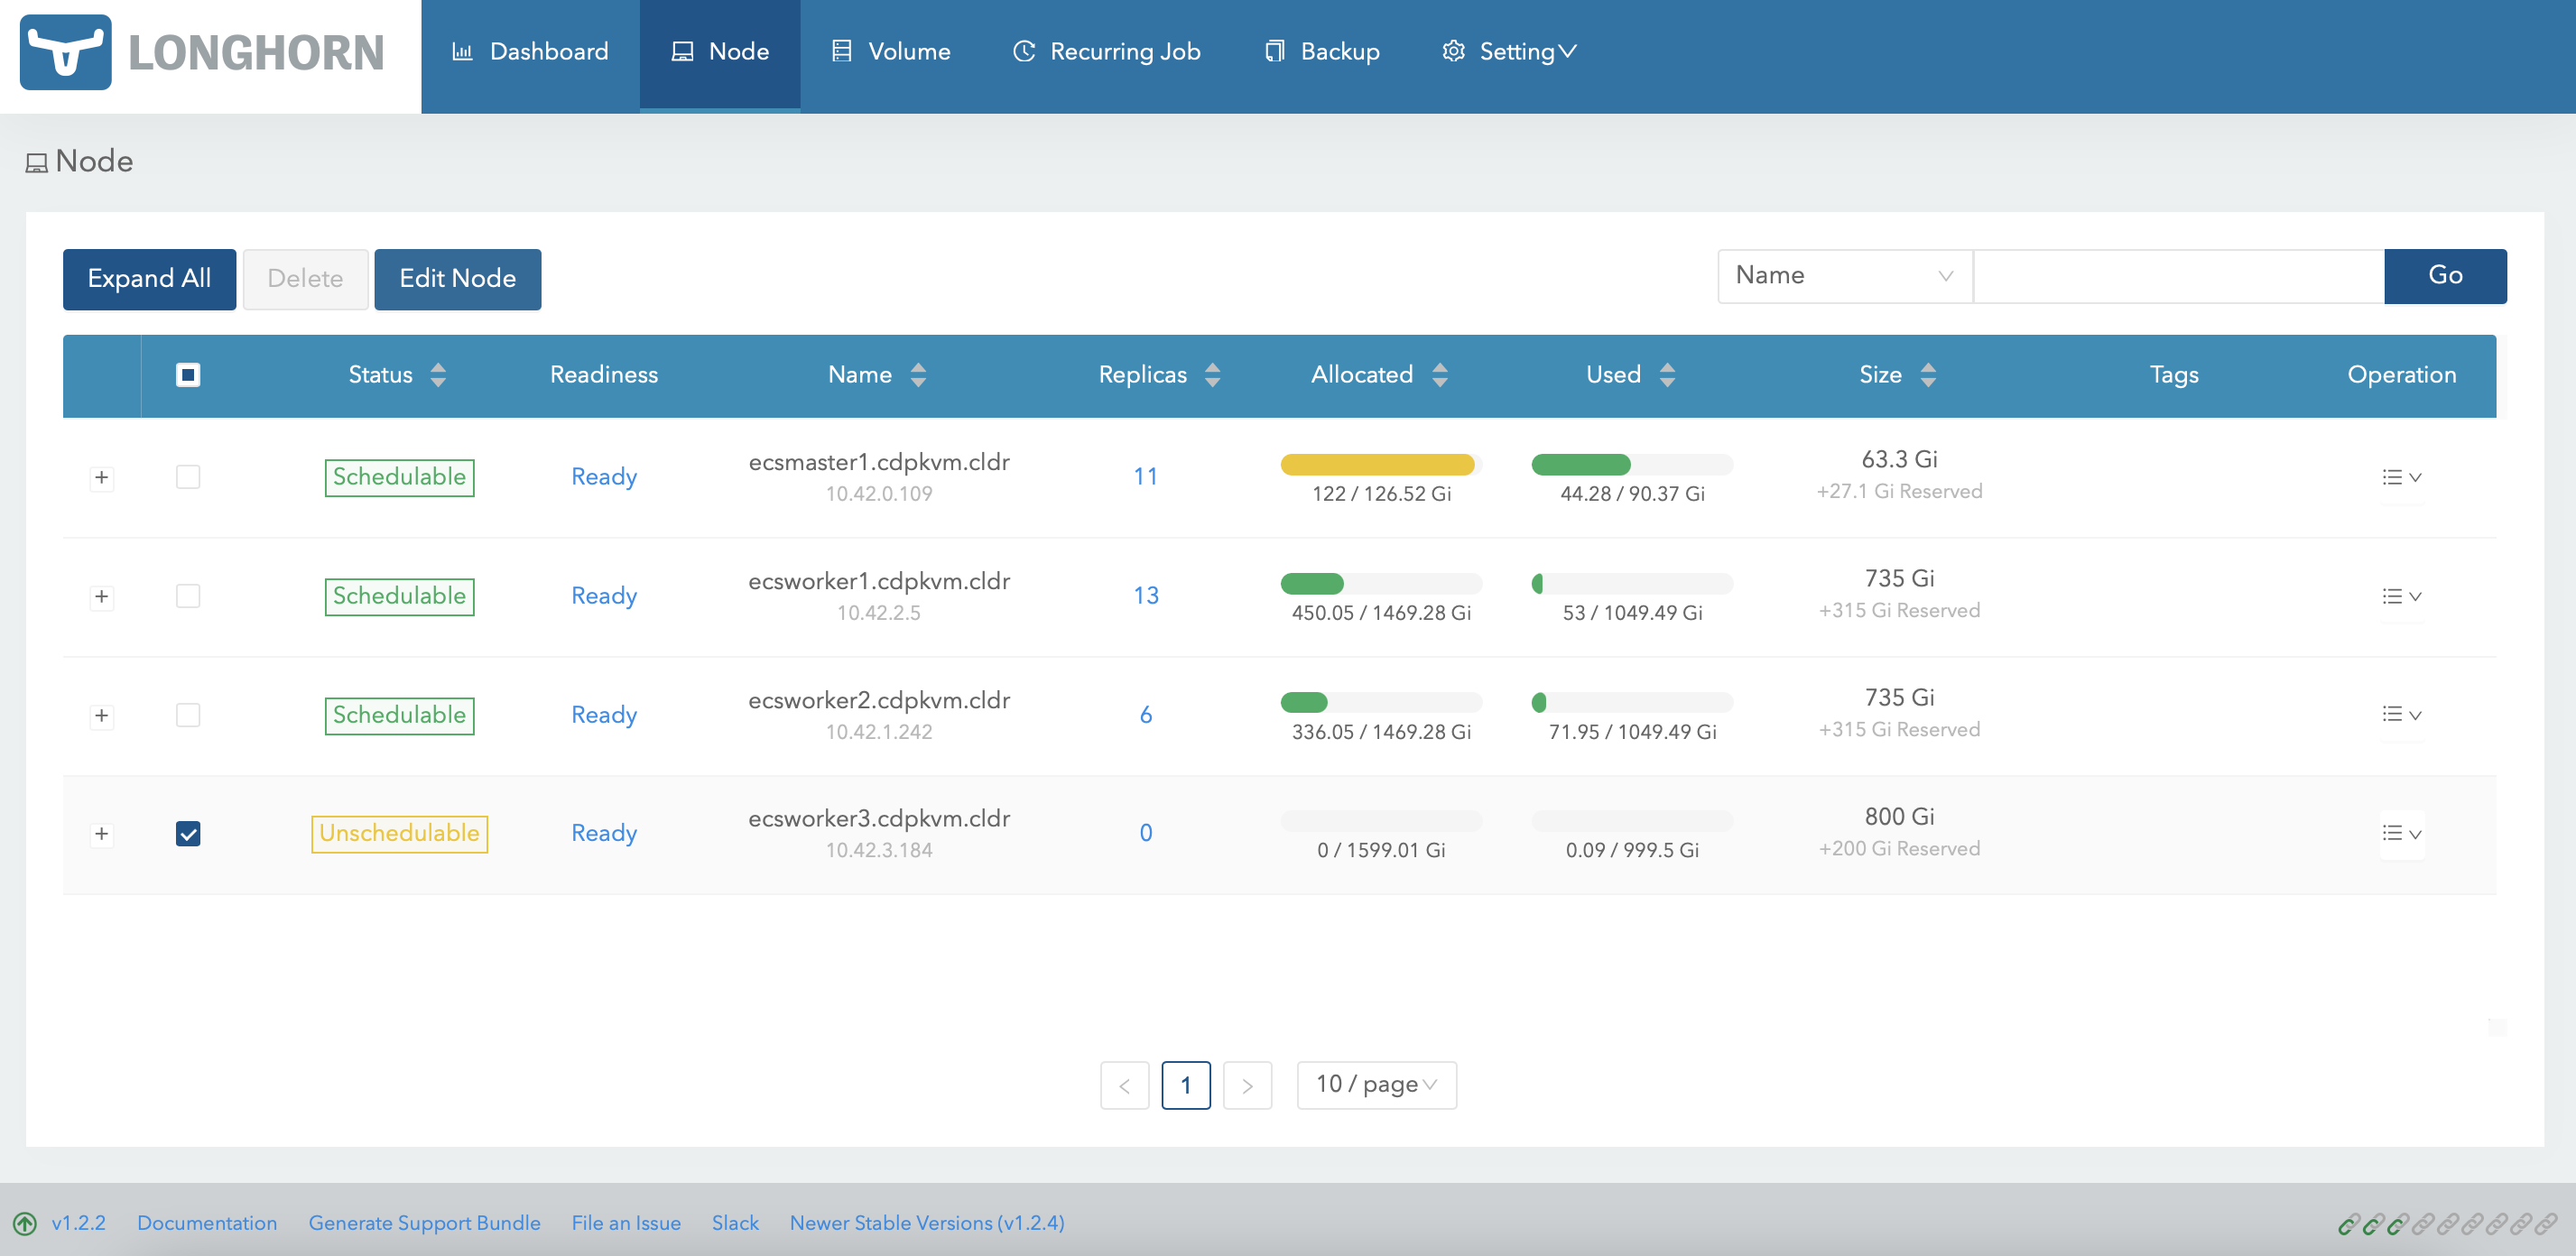
The Longhorn dashboard should reflect that the ecsworker3.cdpkvm.cldr node is now
Unschedulableand has no volume replica.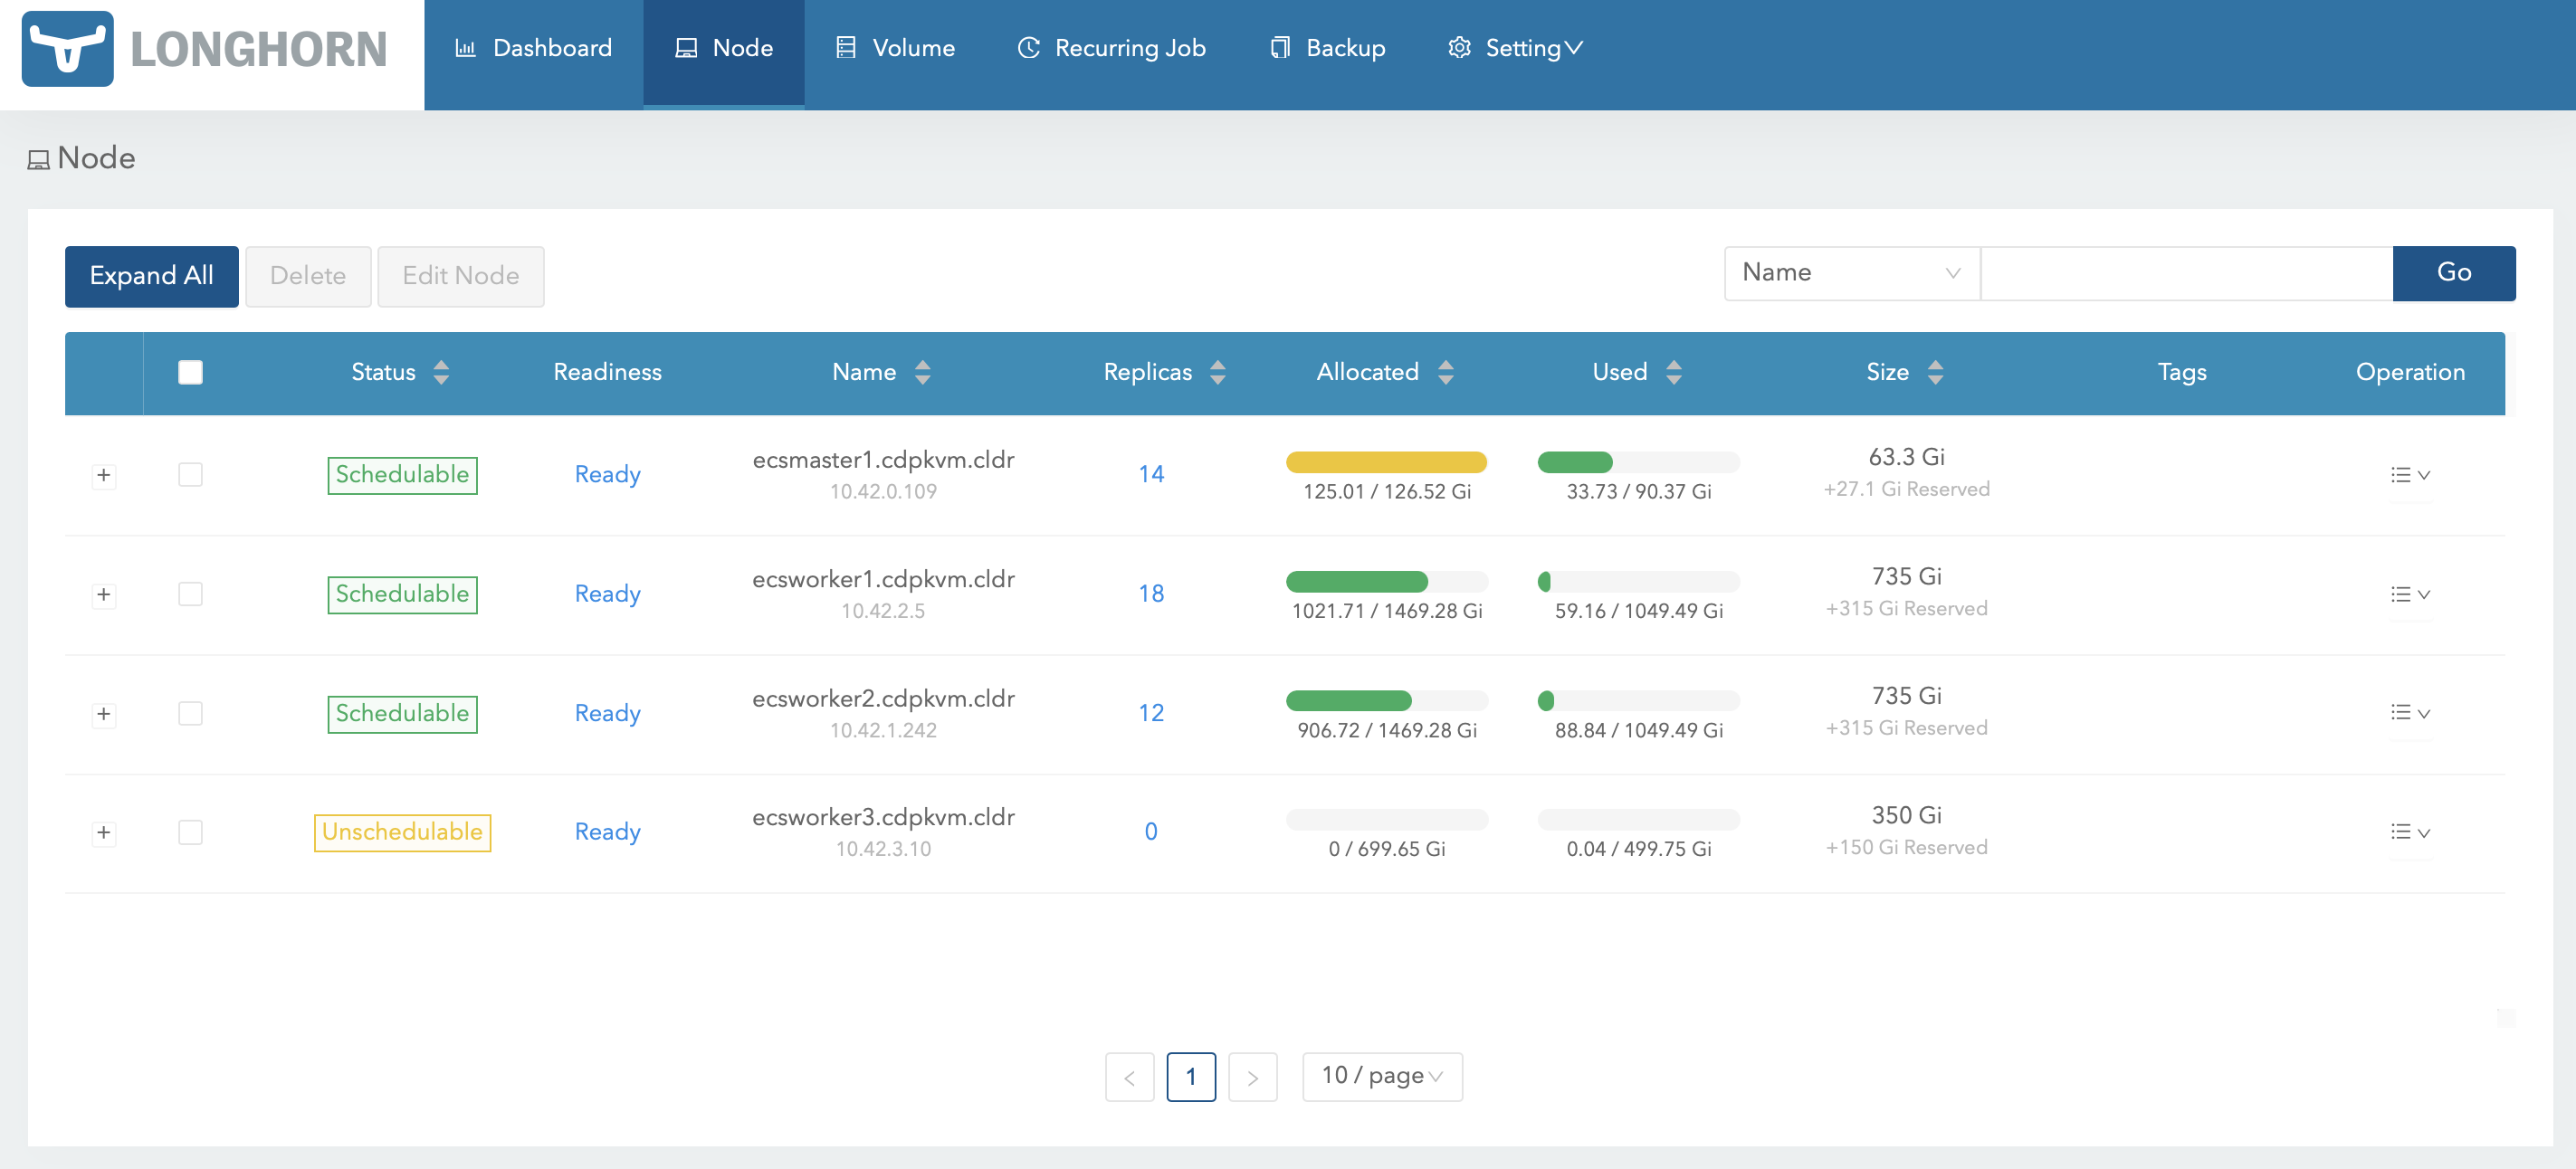
-
At the ecsworker3.cdpkvm.cldr node, check the LVM disk of the
/longhorndirectory mountpoint. In this case, the LVM disk is/dev/vg1/lv1.# lsblk | grep longhorn `-vg1-lv1 252:0 0 500G 0 lvm /longhorn -
Check the information of the first disk that formed the physical volume of
/dev/vdb.# pvdisplay /dev/vdb "/dev/vdb" is a new physical volume of "500.00 GiB" --- NEW Physical volume --- PV Name /dev/vdb VG Name PV Size 500.00 GiB Allocatable NO PE Size 0 Total PE 0 Free PE 0 Allocated PE 0 PV UUID AE3Zoh-pgdd-1vKK-euUl-oELk-v6yF-jnV4X3 -
Create a new physical volume of the new disk to add it into the existing logical volume. In this case, the block ID of the new disk is
/dev/vdc.# pvcreate /dev/vdc Physical volume "/dev/vdc" successfully created.# pvscan PV /dev/vdb VG vg1 lvm2 [<500.00 GiB / 0 free] PV /dev/vdc lvm2 [500.00 GiB] Total: 2 [<1000.00 GiB] / in use: 1 [<500.00 GiB] / in no VG: 1 [500.00 GiB]# pvdisplay /dev/vdc "/dev/vdc" is a new physical volume of "500.00 GiB" --- NEW Physical volume --- PV Name /dev/vdc VG Name PV Size 500.00 GiB Allocatable NO PE Size 0 Total PE 0 Free PE 0 Allocated PE 0 PV UUID Qq89qb-pdM4-X8cR-IekT-vXEd-3Y5R-ThEdM3 -
Check the status of the volume group
vg1. The current storage capacity is 500G.# vgs VG #PV #LV #SN Attr VSize VFree vg1 1 1 0 wz--n- <500.00g 0 -
Check the status of the logical volume
lv1. The current storage capacity is 500G.# lvs LV VG Attr LSize Pool Origin Data% Meta% Move Log Cpy%Sync Convert lv1 vg1 -wi-ao---- <500.00g -
Add
/dev/vdcto the volume groupvg1to extend its size.# vgextend vg1 /dev/vdc Volume group "vg1" successfully extended -
Check the status of the volume group
vg1. The current storage capacity is approximately 1000G.# vgs VG #PV #LV #SN Attr VSize VFree vg1 2 1 0 wz--n- 999.99g <500.00g -
Extend the size of the logical volume
lv1from thevg1volume group.# lvextend -l +100%FREE /dev/vg1/lv1 Size of logical volume vg1/lv1 changed from <500.00 GiB (127999 extents) to 999.99 GiB (255998 extents). Logical volume vg1/lv1 successfully resized. -
Check the status of the logical volume
lv1. The current storage capacity is now approximately 1000G.# lvs LV VG Attr LSize Pool Origin Data% Meta% Move Log Cpy%Sync Convert lv1 vg1 -wi-ao---- 999.99g ```text -
Umount
/longhorndirectory and format the logical volume disk using XFS filesystem.# umount /longhorn # mkfs.xfs /dev/vg1/lv1 -f ```sql -
Mount the
/longhorndirectory and create the/longhorn/ecs/longhorn-storagefolder.# mount /longhorn # mkdir -p /longhorn/ecs/longhorn-storage ```sql -
At Longhorn dashboard, select ecsworker3.cdpkvm.cldr and click
Edit node and disks.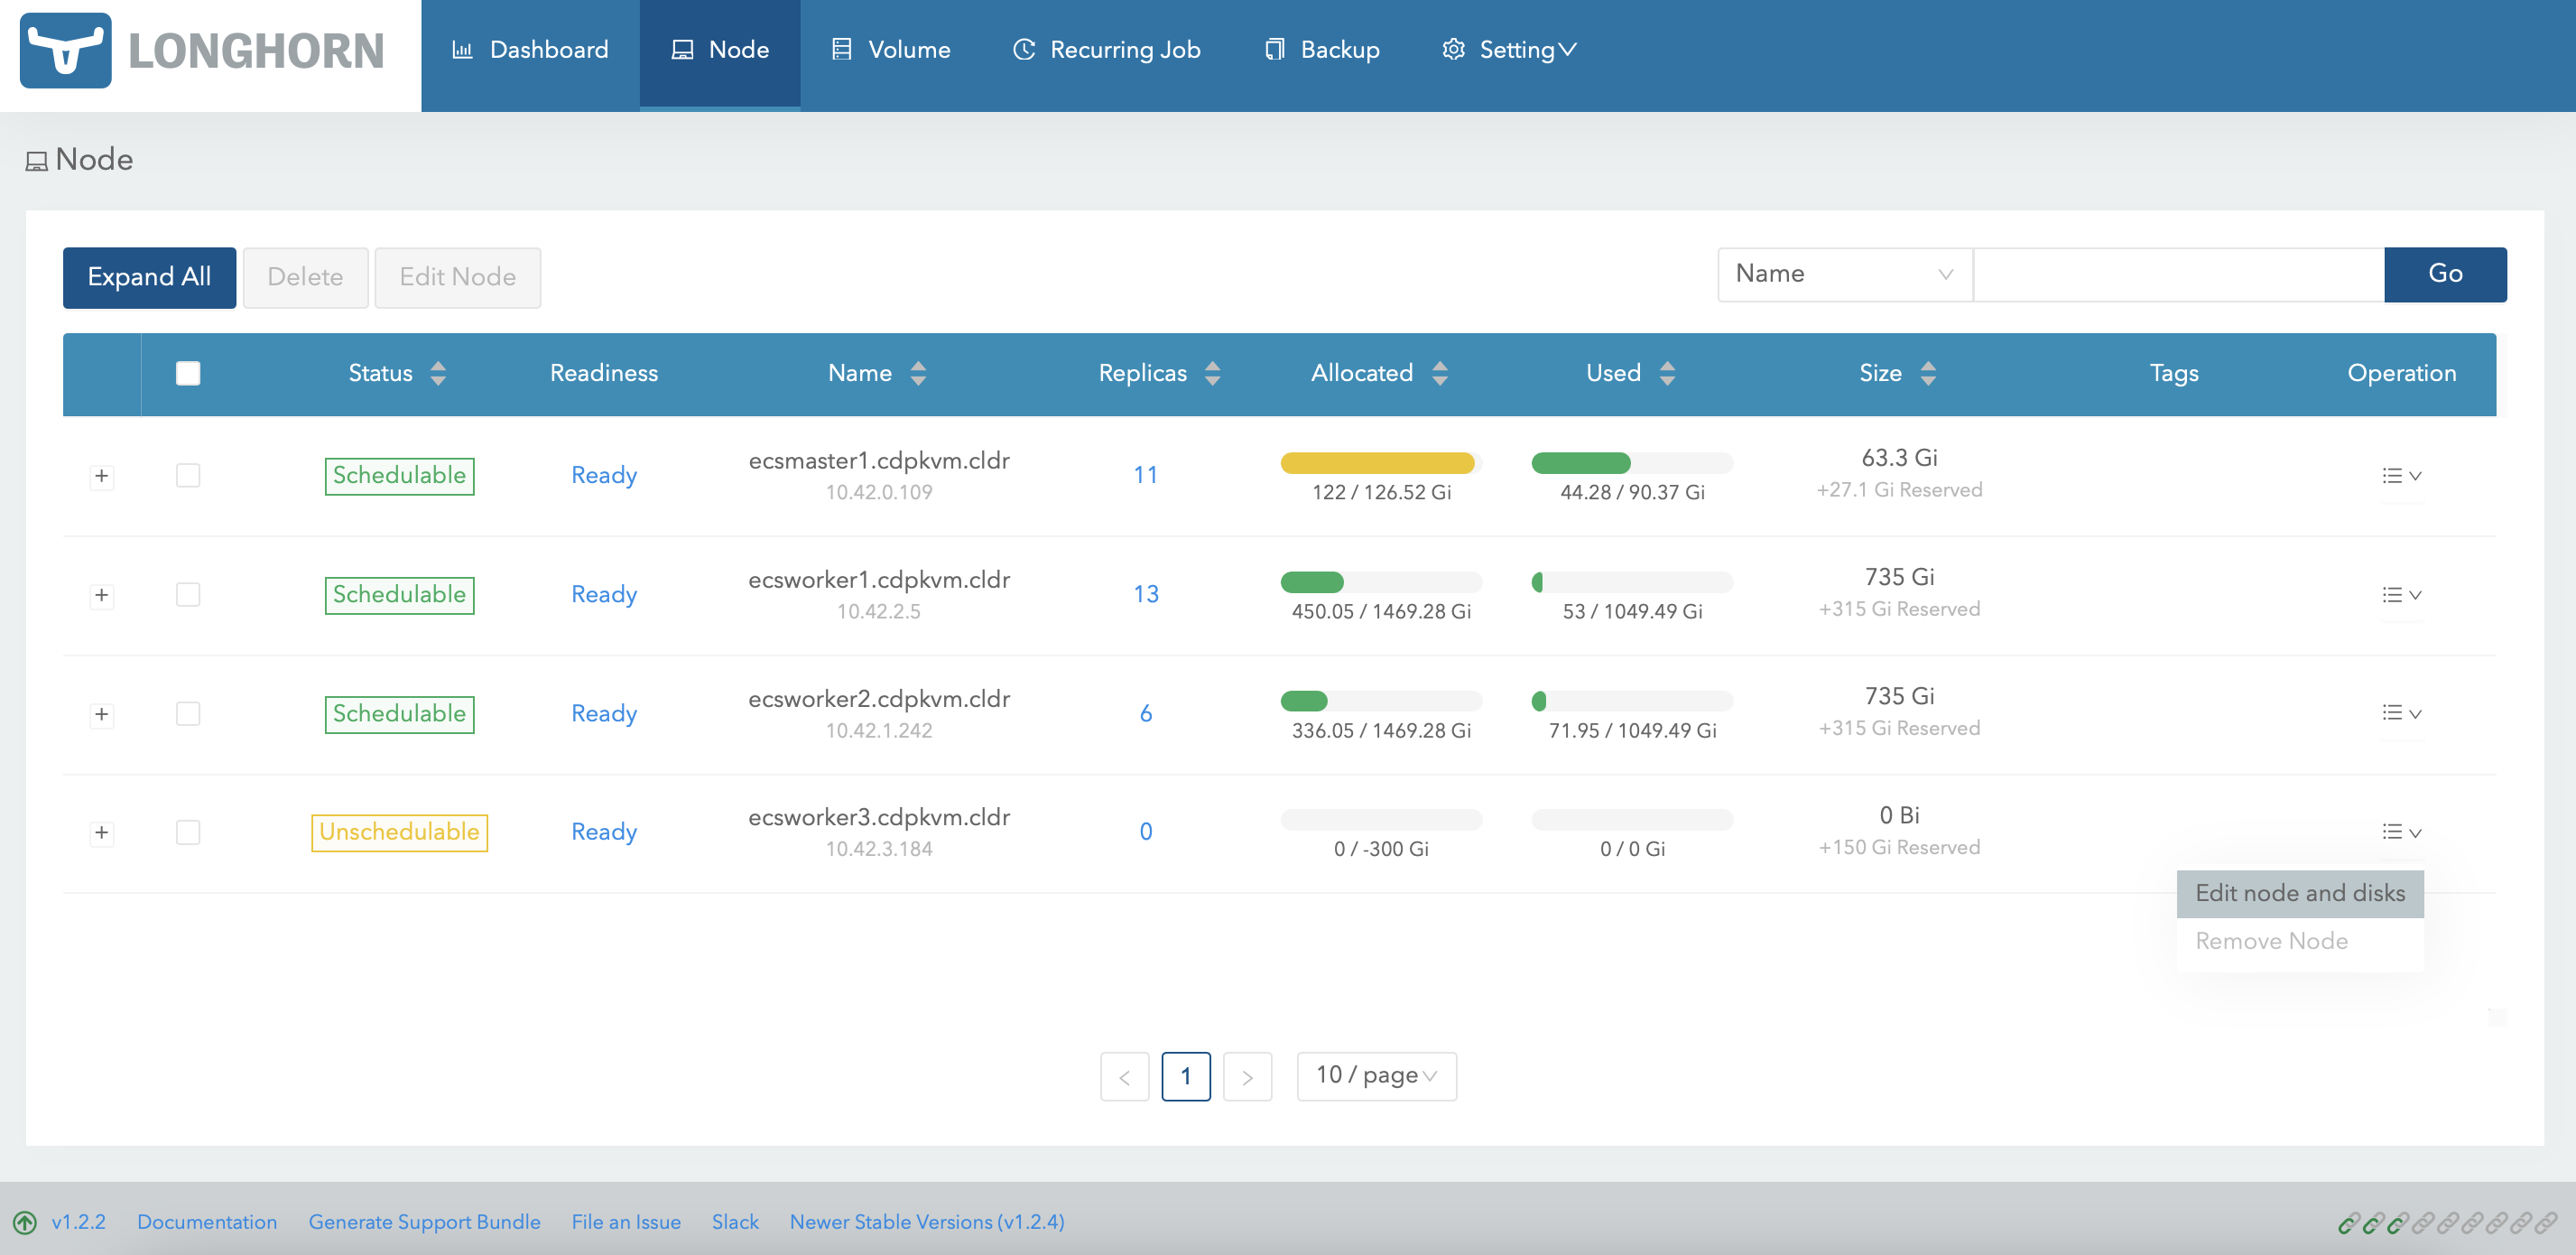
-
Remove the initial disk and click
Save.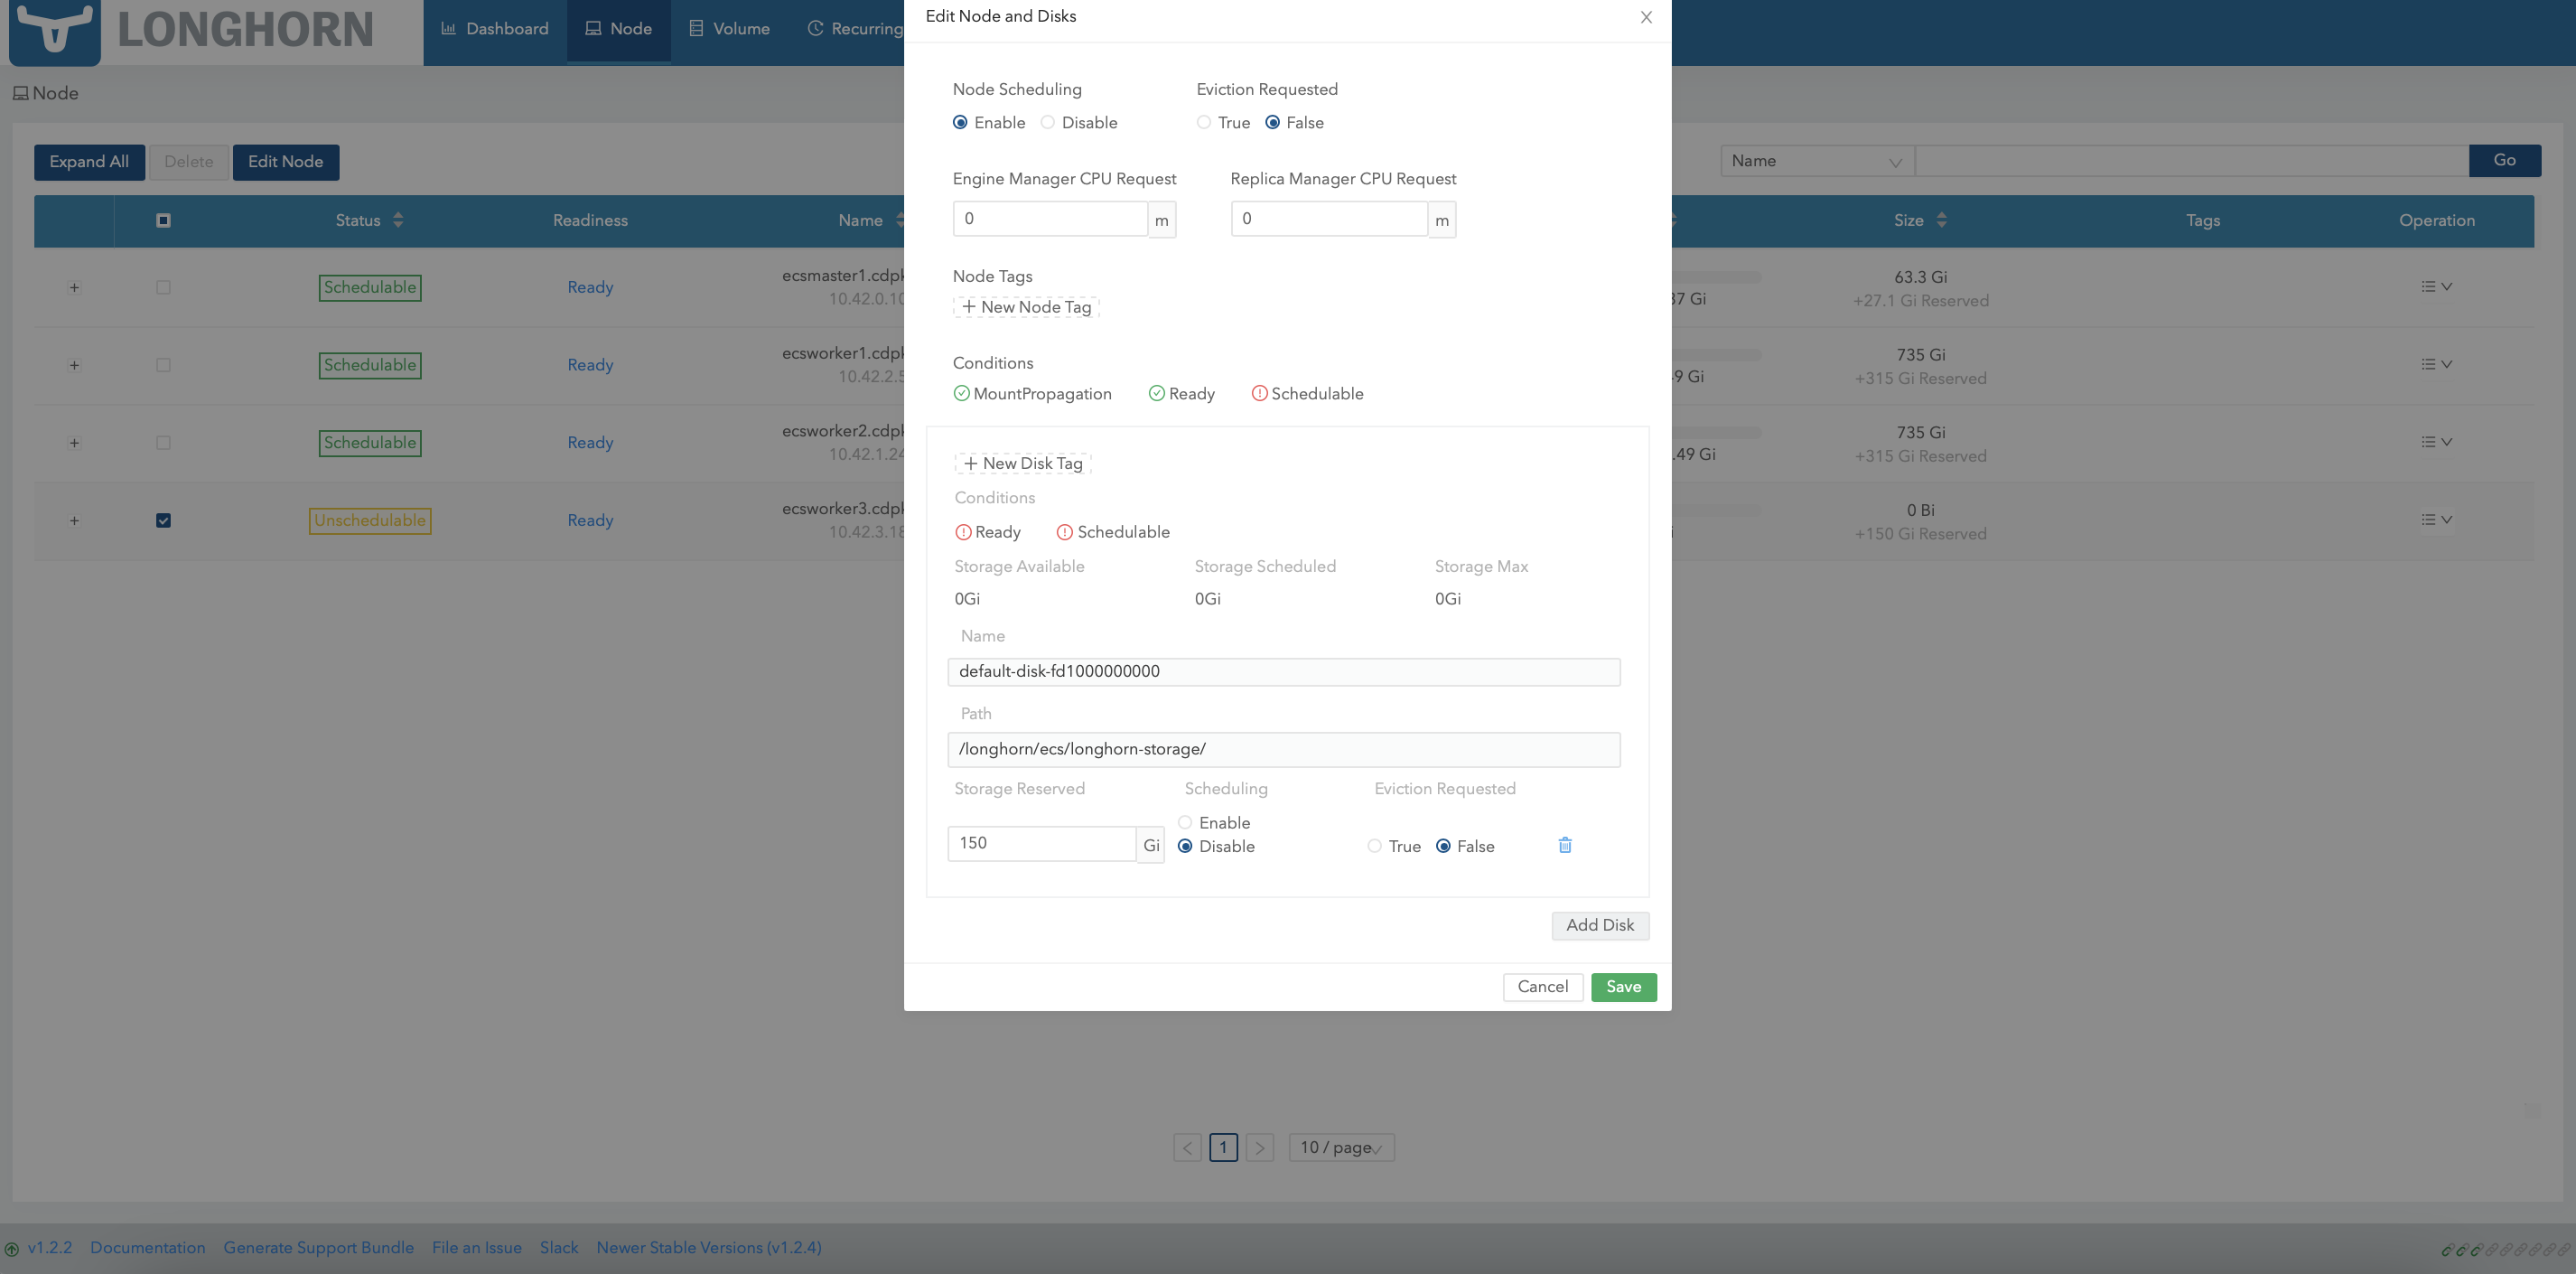
-
Subsequently, select ecsworker3.cdpkvm.cldr again and click
Edit node and disks.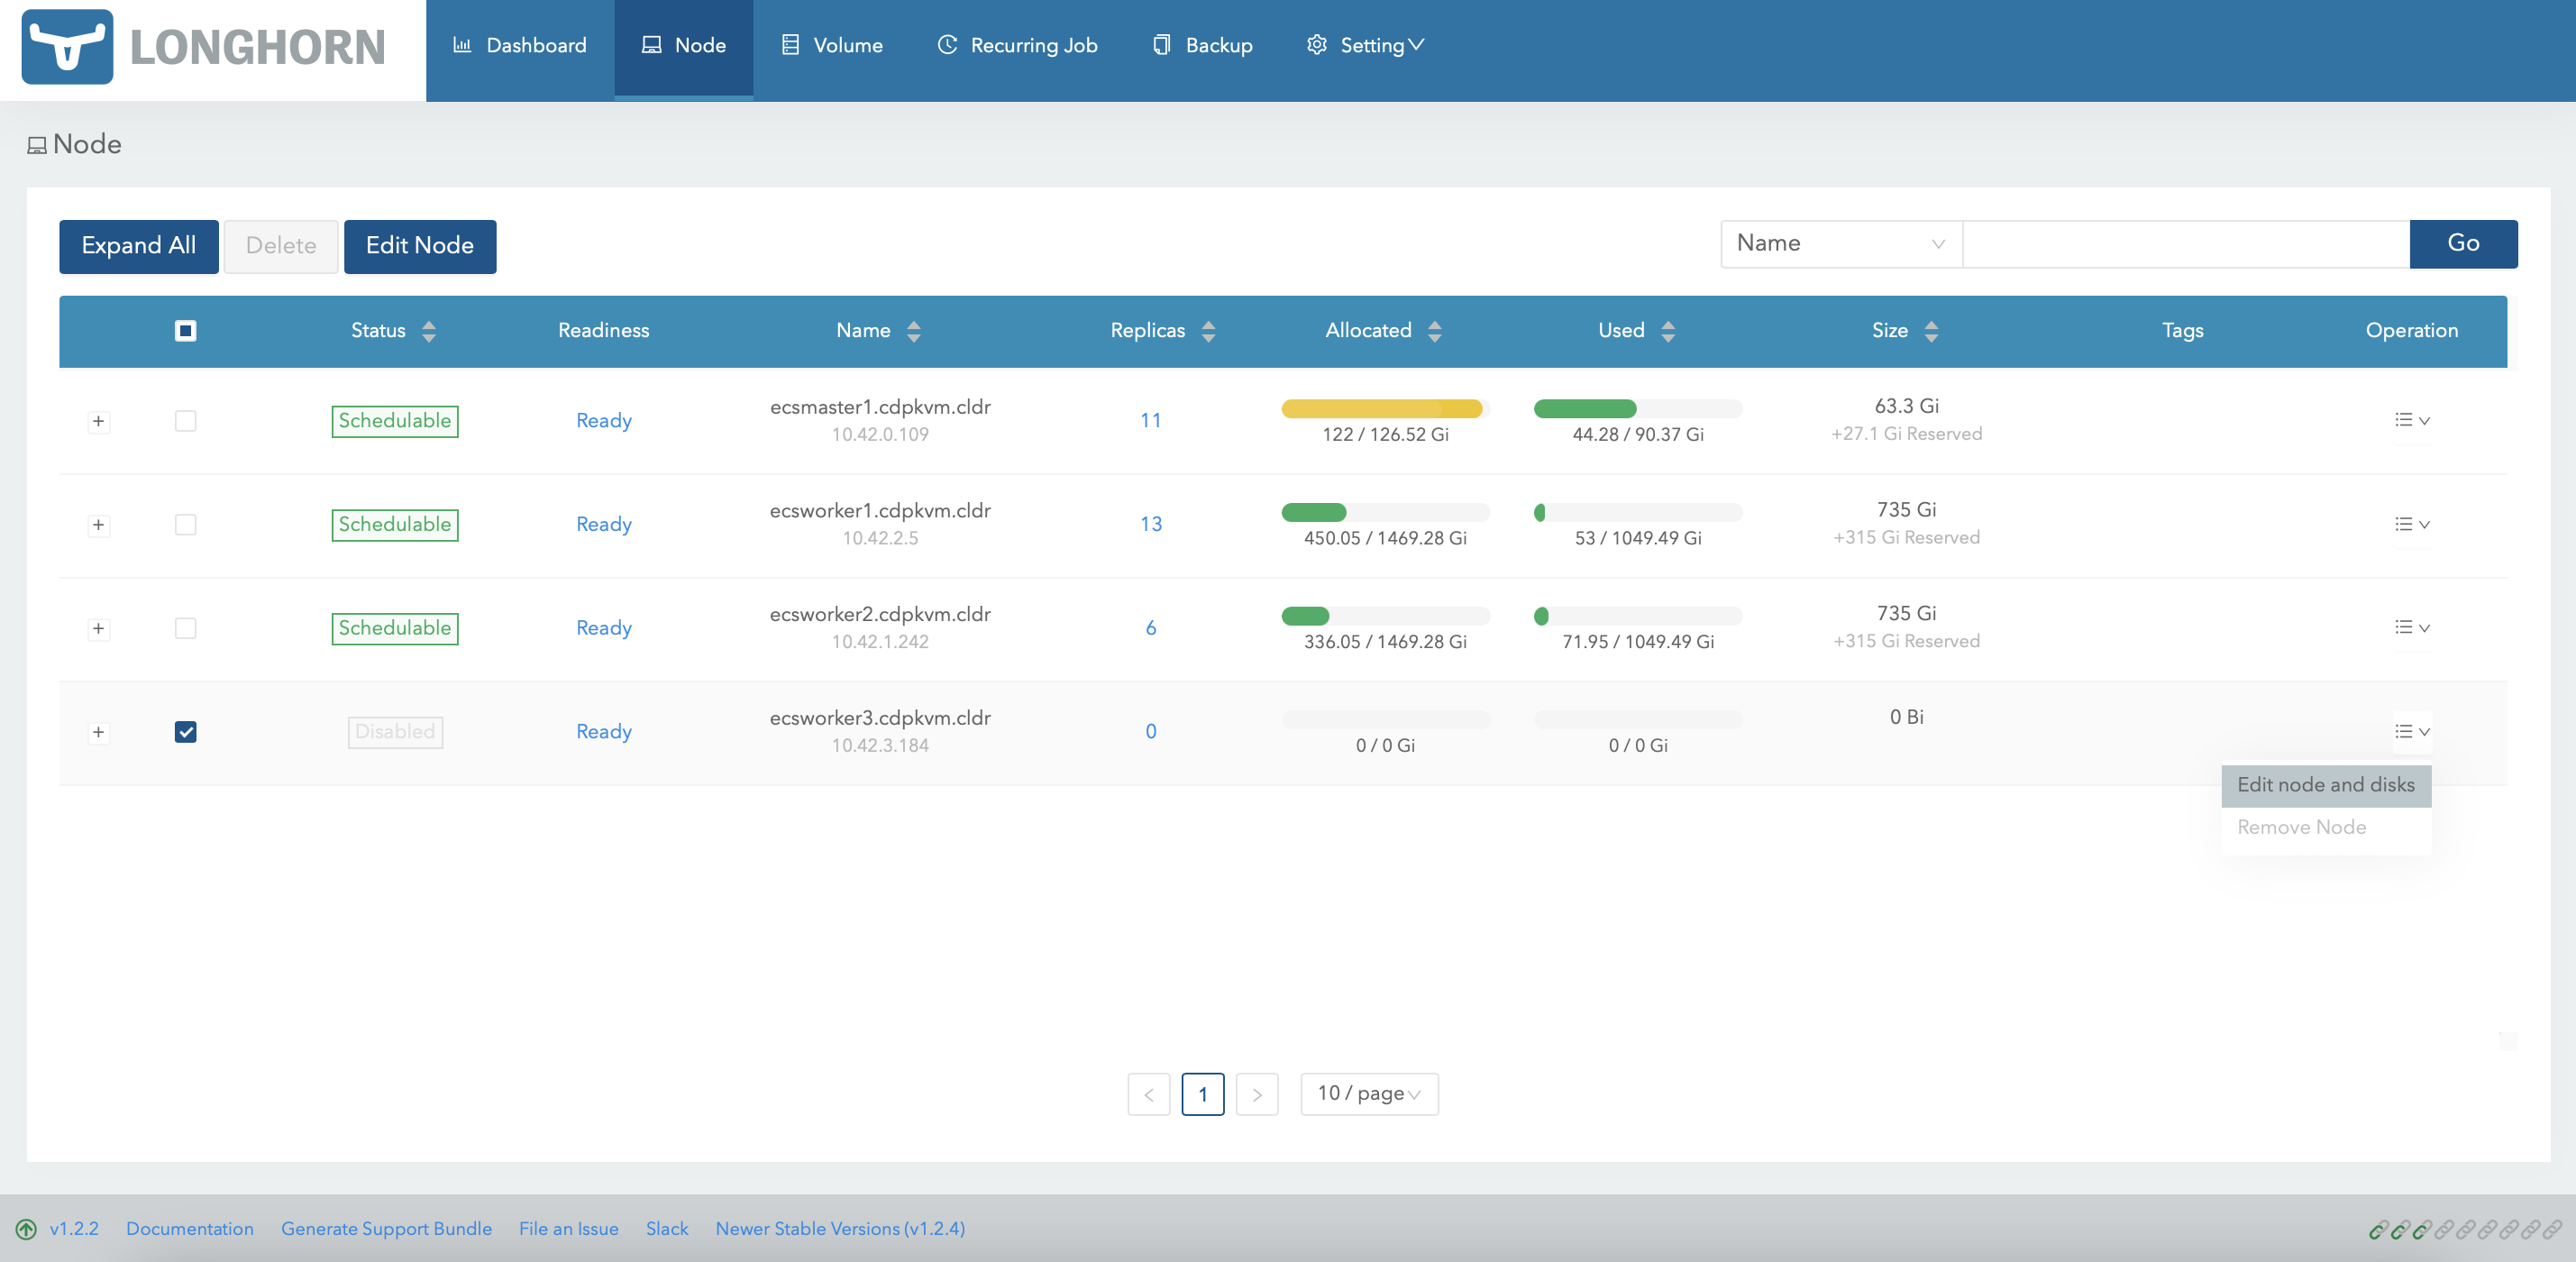
-
Click
Add Diskand key in the following details.
-
The Longhorn dashboard should now reflect the latest size of the LVM volume disk.
-
Run the following command to inform the ECS system to resume scheduling new pods onto the ecsworker3.cdpkvm.cldr node.
# kubectl uncordon ecsworker3.cdpkvm.cldr node/ecsworker3.cdpkvm.cldr uncordoned ```sql -
The Longhorn dashboard should now indicate that the ecsworker3.cdpkvm.cldr node is
Schedulable.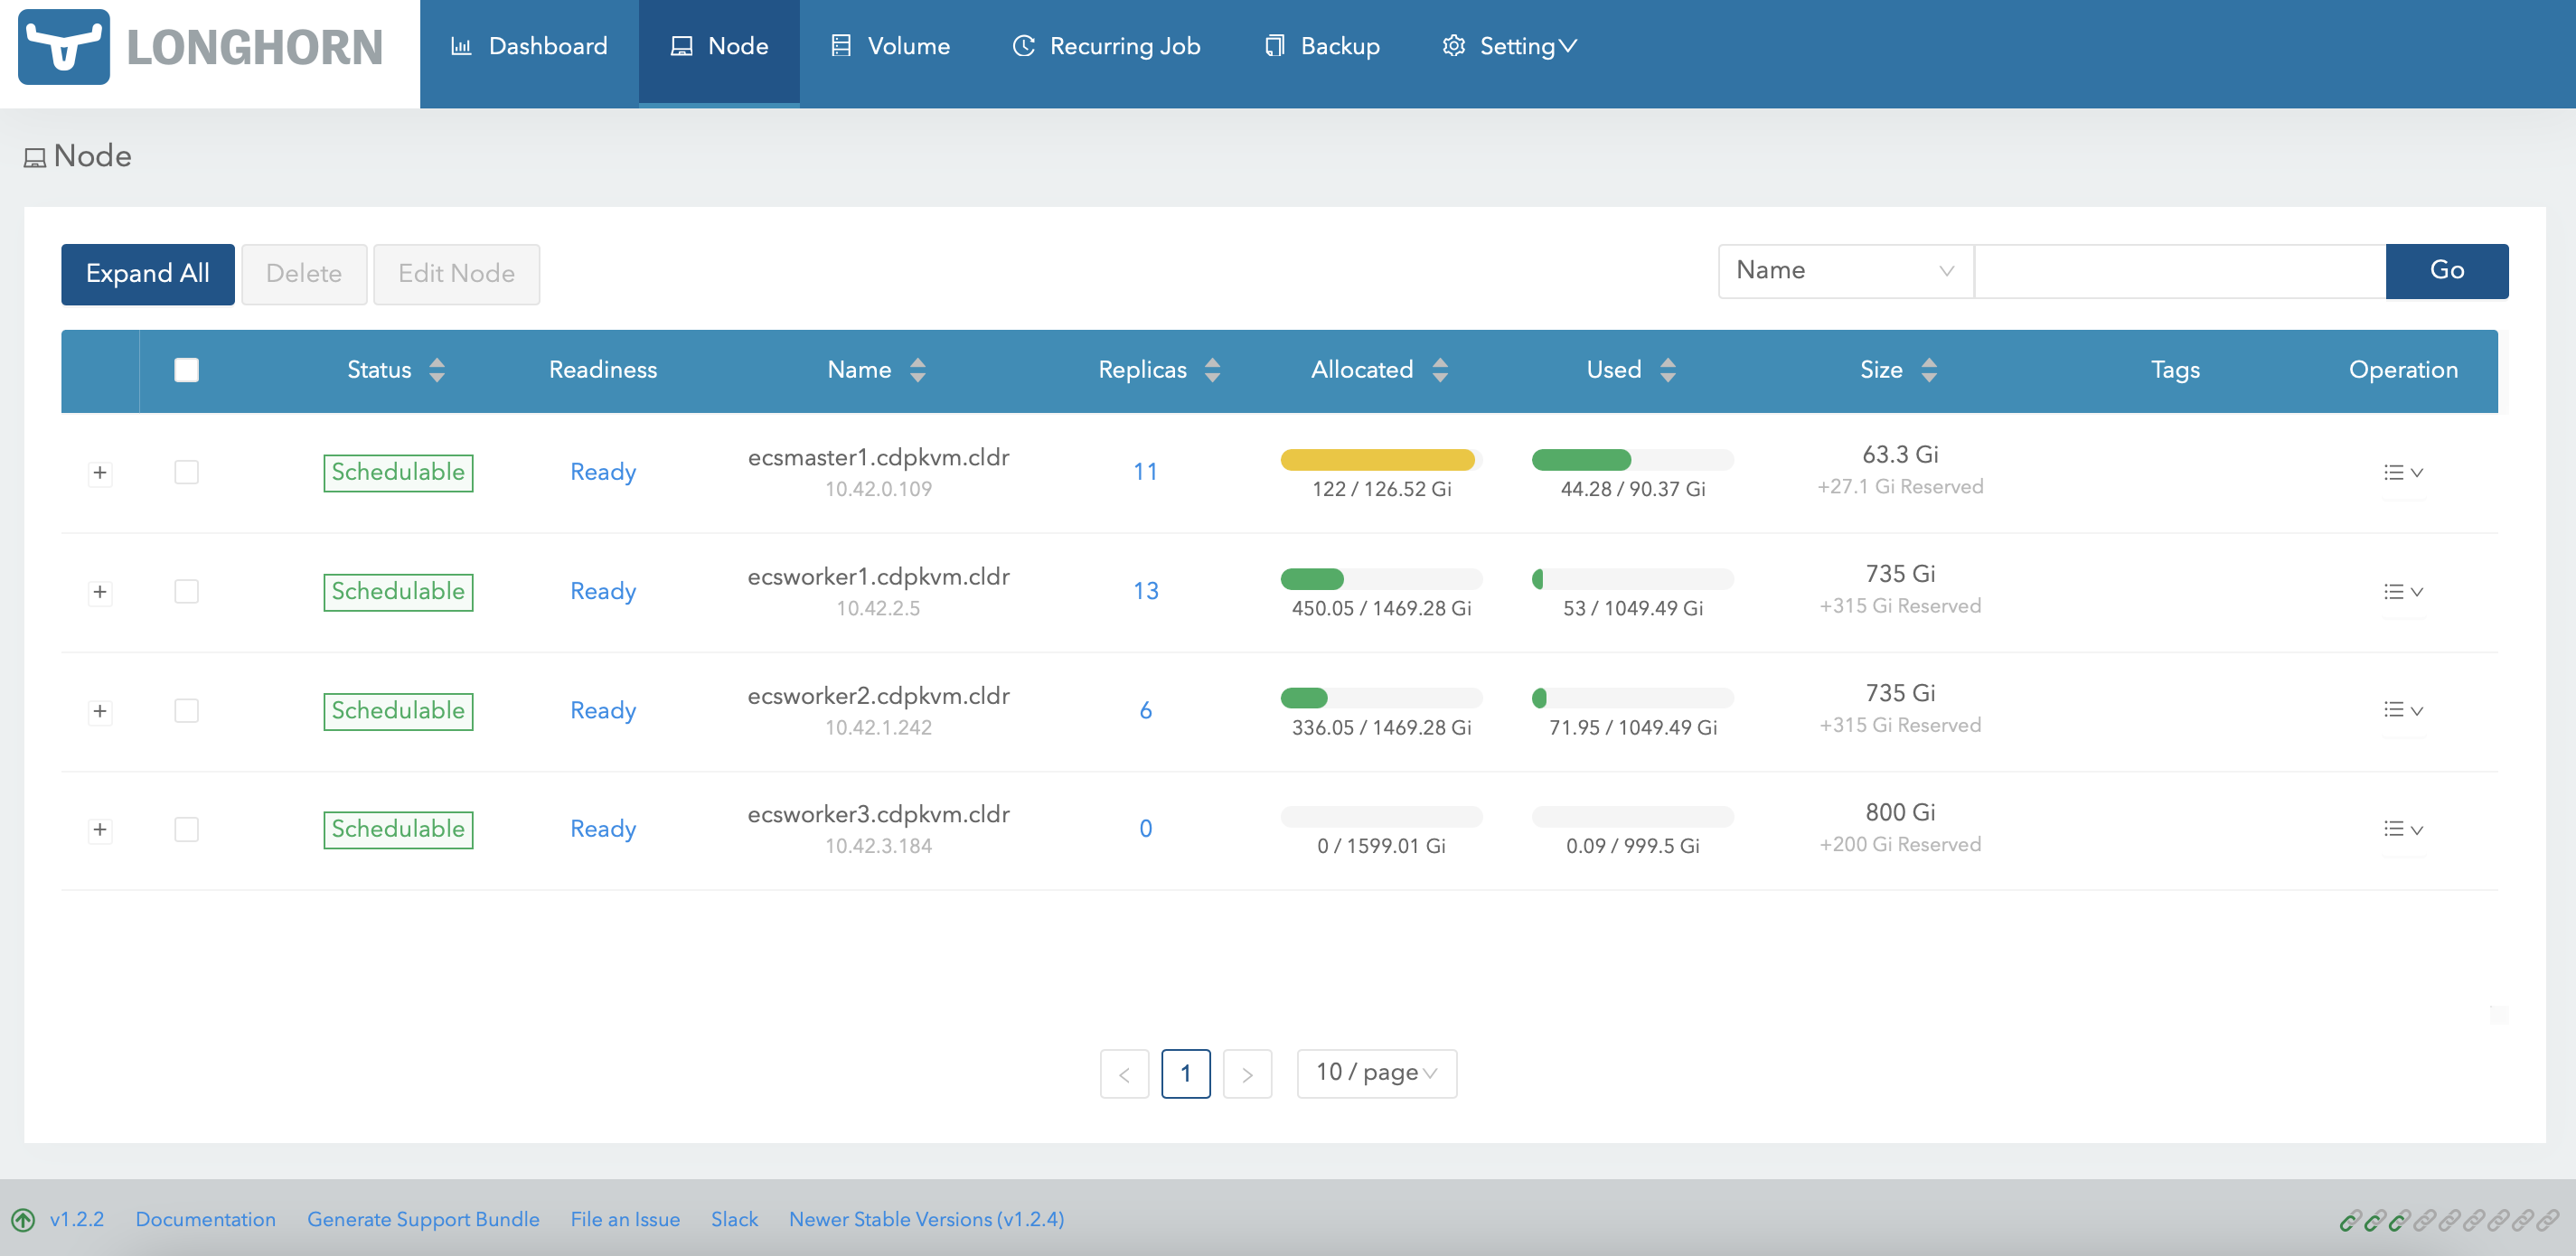
-
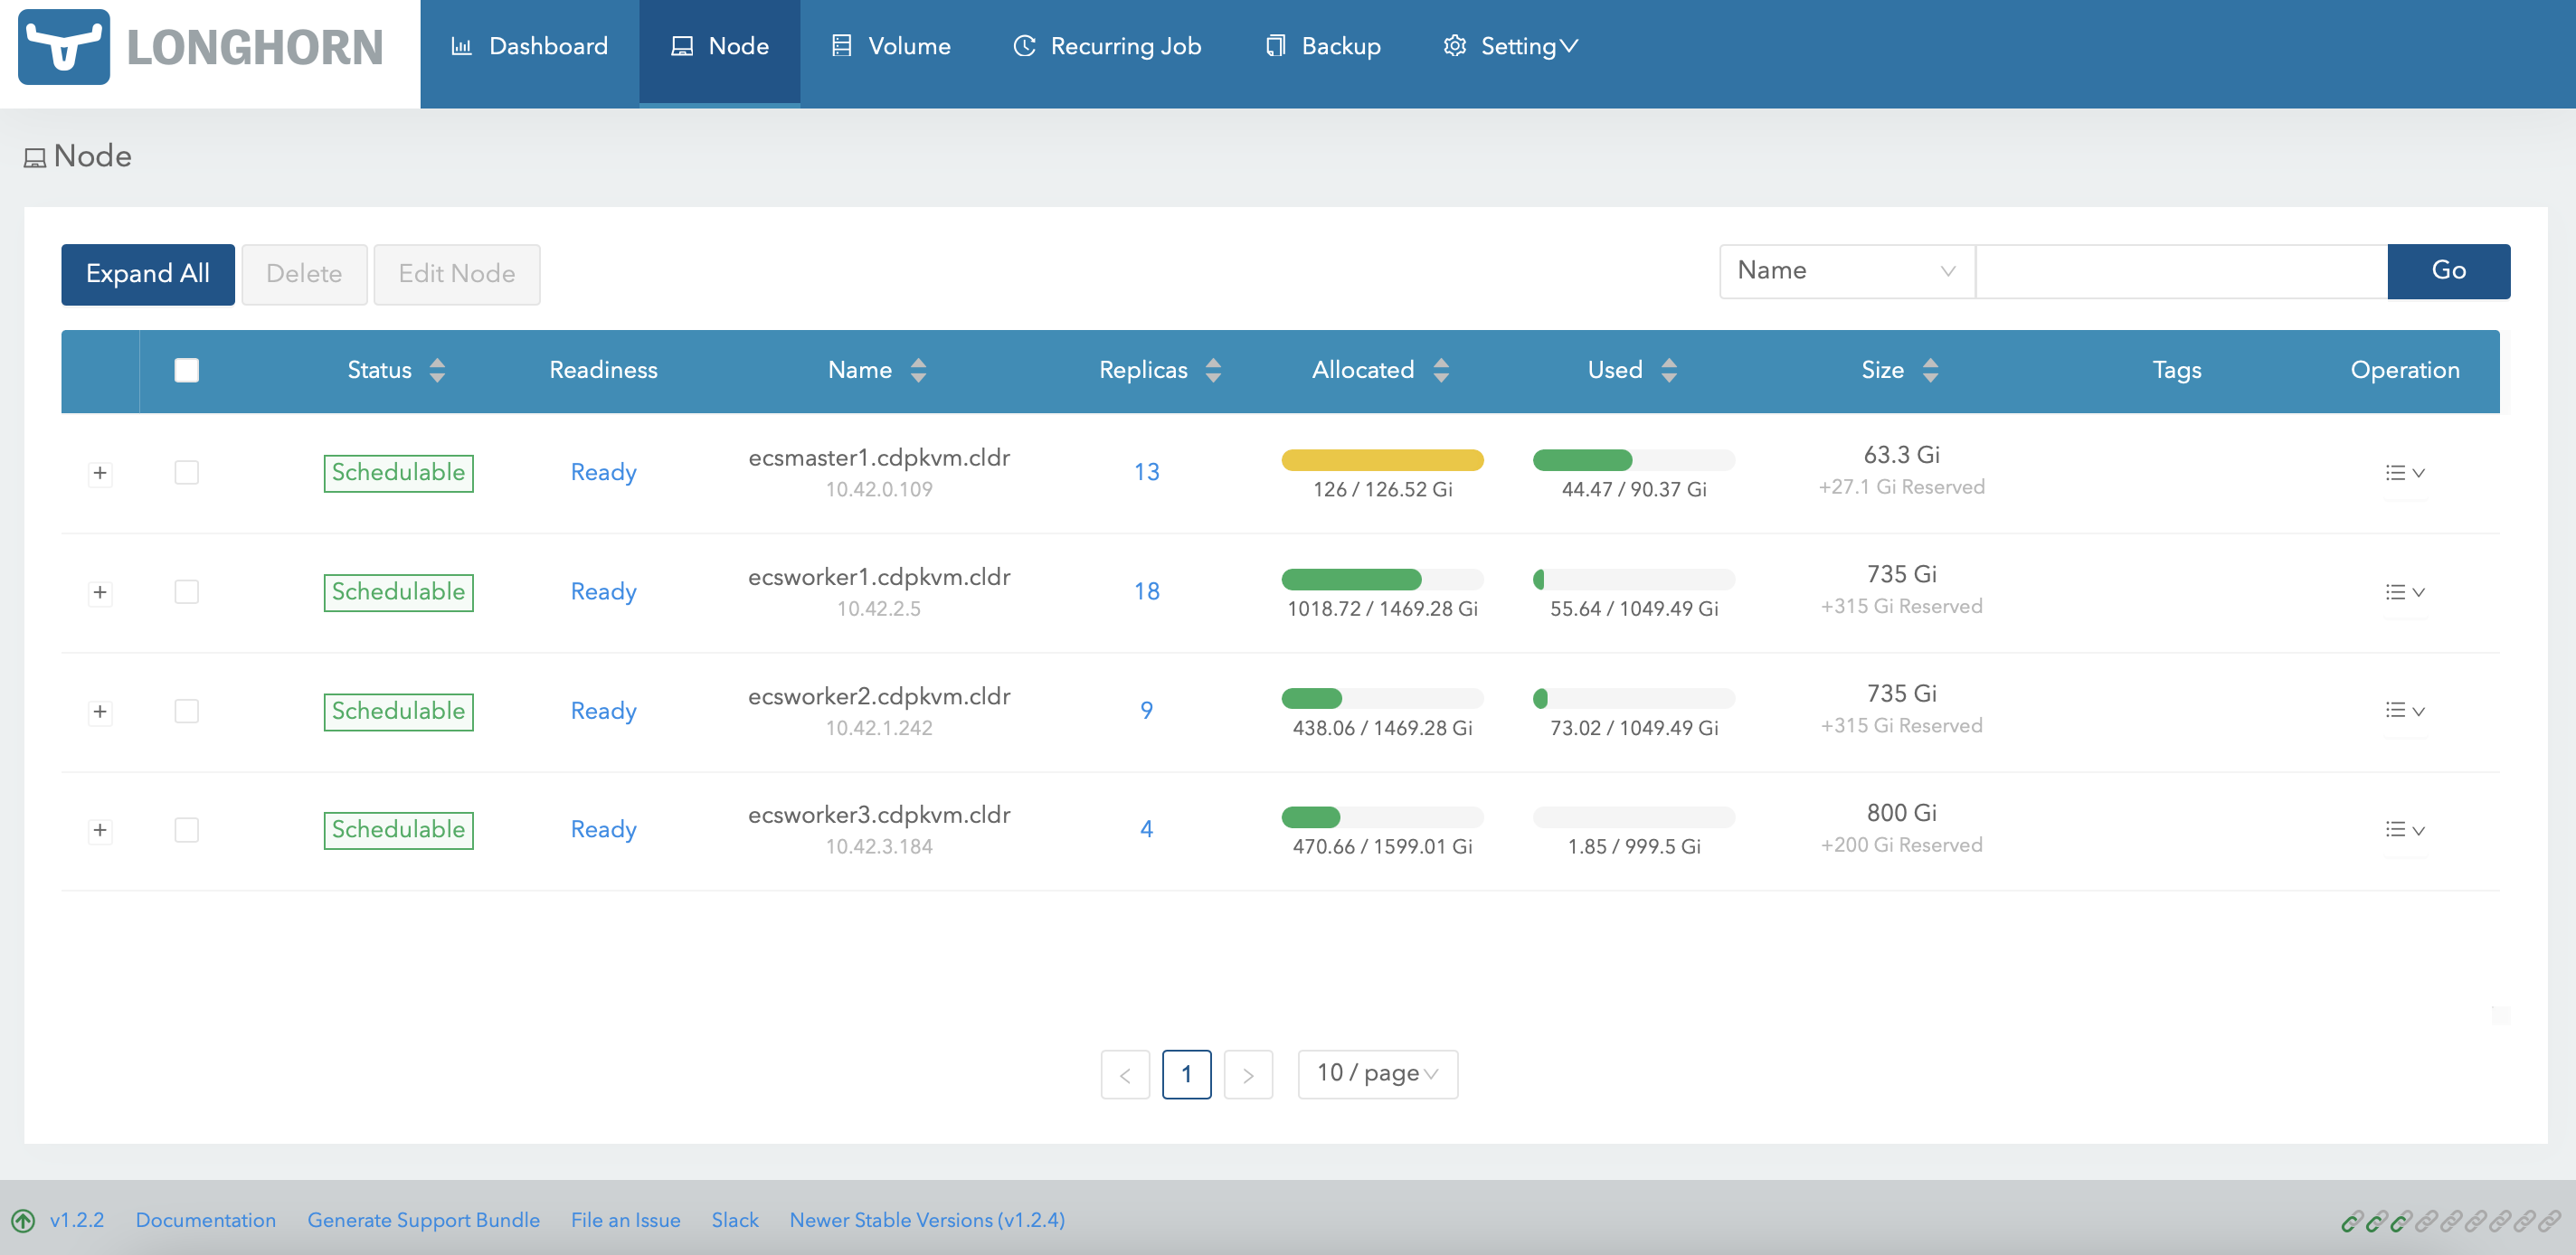
Provision a new CML workspace and the system might select ecsworker3.cdpkvm.cldr node to store the Longhorn volume replicas. In this case, 4 volumes have successfully been created in ecsworker3.cdpkvm.cldr node.
-
At the ecsworker3.cdpkvm.cldr node, check the status of the
/longhorndirectory to verify the outcome of the previous step.# tree /longhorn /longhorn `-- ecs `-- longhorn-storage |-- longhorn-disk.cfg `-- replicas |-- pvc-0041b1bb-1a5c-4bef-8f9b-38a3065cfc23-db38d90f | |-- revision.counter | |-- volume-head-000.img | |-- volume-head-000.img.meta | `-- volume.meta |-- pvc-01e06973-21e6-458e-a128-ecdd462b2b6c-a4150b3c | |-- revision.counter | |-- volume-head-000.img | |-- volume-head-000.img.meta | `-- volume.meta |-- pvc-391ee046-ae71-459c-b033-2db6014d1e3c-b8bdbf18 | |-- revision.counter | |-- volume-head-000.img | |-- volume-head-000.img.meta | `-- volume.meta `-- pvc-f71138e6-3ecb-47cc-abd0-1c9abcb3e2f6-d2f5891c |-- revision.counter |-- volume-head-000.img |-- volume-head-000.img.meta `-- volume.meta 8 directories, 21 files ```text